Thermal Conductivity of Plastic and Metal I.
Experiment number : 1764
Goal of experiment
In this experiment, we visualize the warming of a metal and a plastic plate; the goal is to highlight the different thermal conductivity of these materials.
Theory
Heat transfer by conduction applies especially in solids; it almost does not show in liquids and gases. In the case of electrically nonconductive materials the heat transfer can be explained by particles in the heated part of the body vibrating and transmitting a part of their kinetic energy to the neighbouring particles. In the electrically conductive materials, free electrons are mostly responsible for heat conduction.
A quantity which describes the ability of a substance to conduct heat, is called the thermal conductivity λ, [λ] = W·m−1·K−1, and is slightly dependent on temperature. For a very good thermal conductors (metals) it is in the range of tens to hundreds of watts per meter per kelvin, thermal conductivity of the best thermal insulators (some plastics or air) is about 0.02-0.05 W·m−1·K−1.
Tools
Thermal imaging camera, metal and plastic plate of approximately the same dimensions (roughly of the human palm size). The metal plate must be coated with a matte coating.
Procedure
Put one hand on the metal and at the same time the other hand on the plastic plate. Watch both plates with a thermal camera for 20 seconds. While the metal plate is almost evenly warmed during that time, the temperature of the plastic plate increases only at the point of contact with the palm – plastic is an insulator and does not allow heat distribution in peripheral parts of the plate.
Sample result
A successfully performed experiment is illustrated by the video below. The metal plate is always to the right, the plastic plate to the left.
A thermal imaging camera FLIR i7 was used when making this video. The temperature range of the colour scheme was chosen in the interval 22 °C to 34 °C, the emissivity was ε = 0.95.
Technical notes
In this experiment, the plastic plate was cut from a polypropylene office folder; the metal plate was cut from aluminium sheet 0.5 mm thick.
When conducting the experiment with thermal camera, it is necessary to ensure the examined object to have the same emissivity, so that they “reflect the same way”. Most of the thermal imaging cameras are set to emissivity of ε = 0.95, which corresponds to very little reflecting surfaces. Therefore, it is practical to coat shiny surfaces (typically metal) by a matt coating. In this experiment, the surface of the aluminium plate is coated.
Pedagogical notes
The gradual changes in colour of heated surfaces can lead to frequent misinterpretation that some of the plates contain more heat than the others. That is a wrong concept of heat as state variable. It is therefore necessary to emphasize that what we see on the thermogram, is the temperature (!) distribution, not heat distribution, which only describes the exchange of energy.
Performing the experiment without thermal imaging camera
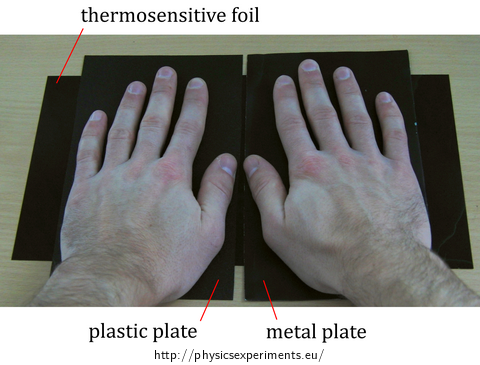
Thermal imaging camera is a very expensive tool, but the experiment can be performed using a much more affordable thermosensitive film, which can be found under the name reversible temperature label. Place the thermosensitive film under the plastic and metal plate (see Fig. 1). This way it is not necessary to coat the shiny surfaces by a matte coating.

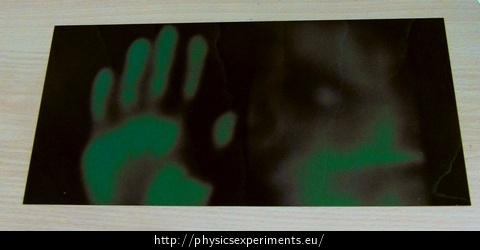
In this experiment, the thermosensitive film operating in the temperature range from 25 °C to 30 °C was used. At room temperature (about 22 °C), the film is black; when it is heated above 25 °C, it changes colour through brown to green. The result of the experiment using thermosensitive film is shown in Fig. 2 (the metal plate is to the right, the plastic to left). While the thermosensitive film under the plastic plate shows the outline of the palm, the film under the metal plate shows that the plate warmed evenly.


